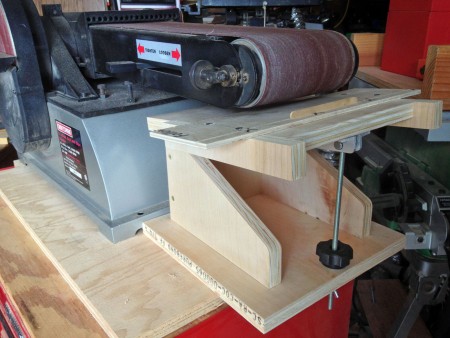
The first workshop for our builders guild was creating a “mini-thickness sander” jig. This tool/jig has become invaluable in shaping small parts, leveling, and putting scoops on bridges. After an afternoon of cutting plywood, some machine work and final assembly, seven ukulele builders produced a very useful attachment to our bench sanders – perfect for thinning smaller work pieces.
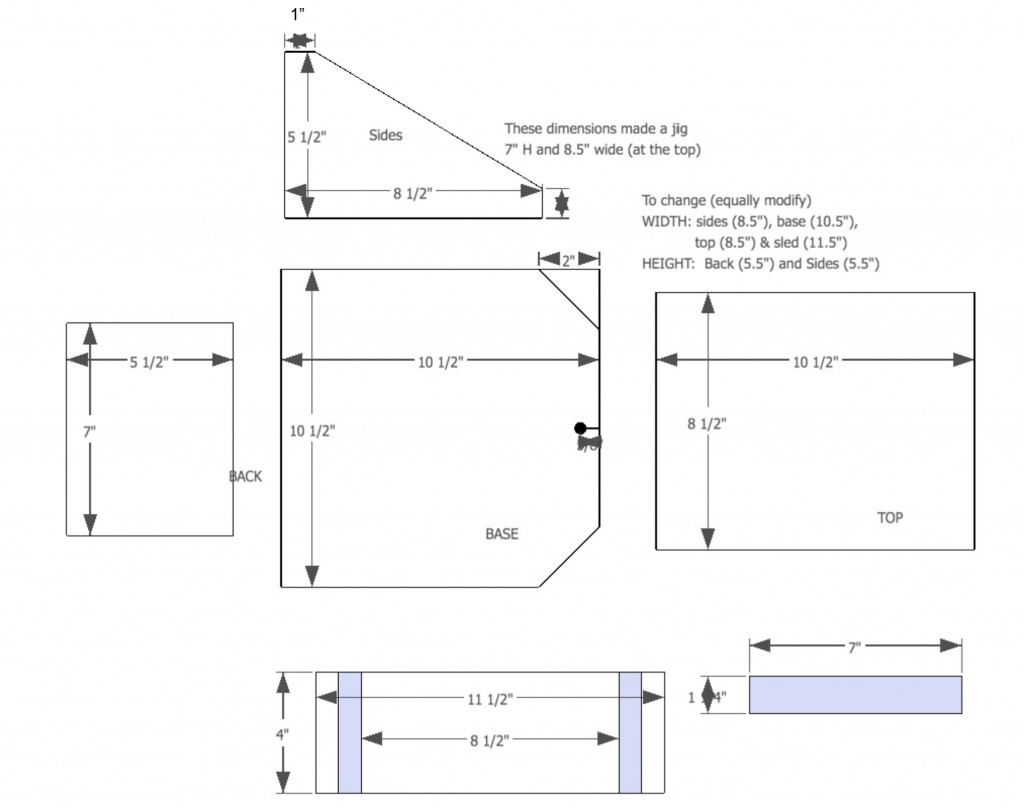
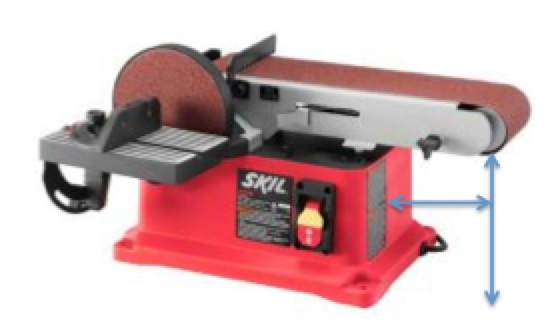
Properly mated to your bench top sander, it is remarkably accurate. Some have permanently mounted both the sander and this jig so alignment is always spot-on. At the bottom of the page is a parts list and cut list. This really is simple so you should be able to figure it all out by looking at the photos. Note: the plans dimensions are for a Porter-Cable benchtop sander available at Lowe’s. You should adapt these plans to the size (height) and possibly width of your benchtop sander. The tilt-able platform should be a couple of inches below the height of sanding roller. Contact me if you have questions.

Building the Mini-Thickness Sander
This project could be one of your easiest to build yet will likely end up being one of the more valuable tools in your shop. I use this to thickness sand headstocks, flatten small pieces like nuts & saddles, create & shape bridges, and even assist in forming volutes. Any part that’s too small for your big drum sander is a candidate.
Parts:
- 5 pieces of 3/4″ ply (base, 2 sides, back and the top)
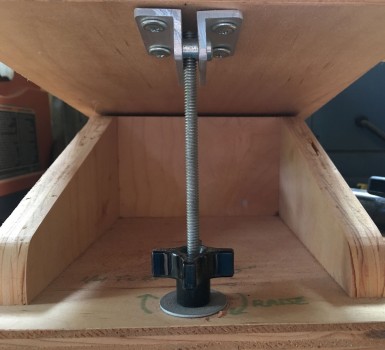
- 1/4″-20 threaded rod, knob, wing-nut, (2) fender washers, and barrel nut
- This “mechanism” adjusts the distance between the sander and the jig
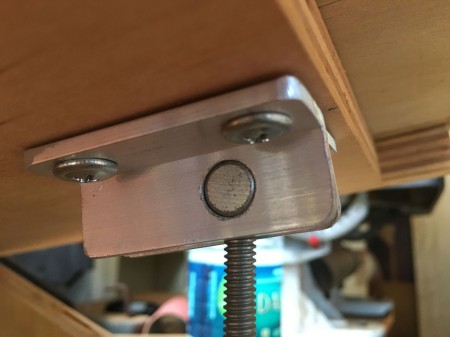
- Two 2″ pieces of 1″ angle aluminum
- This is how I mounted the barrel nut to the underside of the top.
- Maybe a better way?
- 6″ strip of piano hinge
- pivots the top as you adjust the distance between the jig and bench top sander
An optional, yet very handy addition, is the mini-thickness sander sled. It consists of
- piece of 1/8″ ply
- two pieces of wood for rail guides
- popsicle sticks
Build Notes
- Before cutting, measure your bench top sander for the height of the drum sander from the bench to the bottom of the sanding belt
- Modify the Side & Back piece measurement to match the height of your bench top sander
- The end result should have the top of the jig to be about 1.5″ (not critical!) below the bottom of your sander
- For example: assuming you use 3/4″ ply and sander has a clearance “height” of 8.5 inches:
- Height of sander – Clearance (1.5″) – width of top and bottom ply (2*3/4″ or 1.5″) = Height of sides
- 8.5 inches – 1.5 inches – 1.5 inches = 5.5 inches is the height needed for the Sides & Back
- Cut out Ply per plan
- Prep Sides
- Take off 1″ from front edge of sides
- Cut side angle by drawing line between front edge and 1″ forward of the back edge (see diagram)
- This creates a “shelf” for the top
- Round over front edge if desired
- Prep Base
- Drill 3/8″ hole 1″ back from center of front edge
- OPTIONAL – Round over front corners (or trim off a bit per plan)
- Make Barrel Nut Holder
- Drill 10mm hole about 3/4″ from edge (diameter of barrel nut)
- Prep Top
- Mount Barrel Nut Holder so Barrel Nut hole is 1″ from Top
- Assemble!

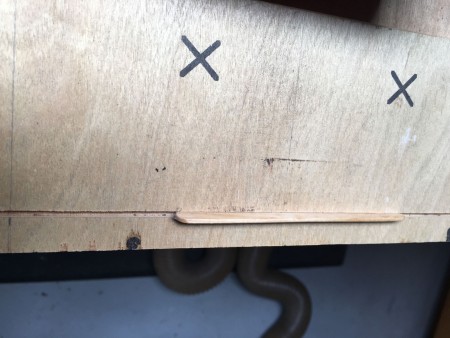
Mini-Thickness Sander Sled
One nice addition is the Mini-Thickness Sander Sled. It makes squaring up parts to the sander easy plus it will save your fingers!
Hopefully the pictures explain it all and the parts are listed above. The “nifty” aspect of the sled is the kerf cut a little forward of the back edge. This kerf holds a popsicle stick that acts as a miter would on a table saw. If you sand down the popsicle stick, it’s easily replaced with a new one.