I made this Digital Temp Controller to provide highly accurate control of the bending temperature. At the heart of the device is an AI-based digital device that can maintain any temp to within about a degree of target. This has saved my countless moments of utter frustration!
Below I’ve provided information on how you can make and use your own Temp Controller.

How I Bend
Here’s my cookie-cutter approach to bending sides with no breaks (so far!) and minimal to no spring-back:
Making the “Sandwich”
- Cut 2 strips of parchment paper the same size as the side. I use the brown paper Stew-Mac puts as filler in their shipments.
- Wet the paper on both sides with water using either a spray bottle or a dip in a pan. Optionally I may wet the sides as well (spray or quick dip).
- Place the paper on each face of the side.
- Create a sandwich using a steel slat, the wood sandwich from above, another slat and the blanket on top.
- I actually use 3 slats so the sandwich would be steel slat, wood/paper sandwich from above, 2nd slat, blanket and the 3rd slat on top. This protects the blanket from the bending jig.
Bending the Side
- Slide the sandwich into the bender
- Tighten up the waist to hold it all in place
- I using some waste wood to lift the blanket away from the ends of the side sandwich until later. This keeps the heat off the ends until I’m ready to bend them.
- Set my Temp Controller to 280 ~ 300 degrees F and turn on the blanket
- When the temp reaches about 260 I start to slowly bend the waist until almost bottoms out.
- Remove the waste wood and add mini-clamps to ends to allow the sides to warm up.
- Slowly bend the ends until they are against the mold
- Continue bending the waist until it bottoms out
- Reduce temp to 250 degrees F
- Let sit for 15 minutes
- Increase temp to 300 degrees F
- As soon as 300 degrees is reached…Turn off Temp Controller, unplug blanket, and leave overnight or until cool
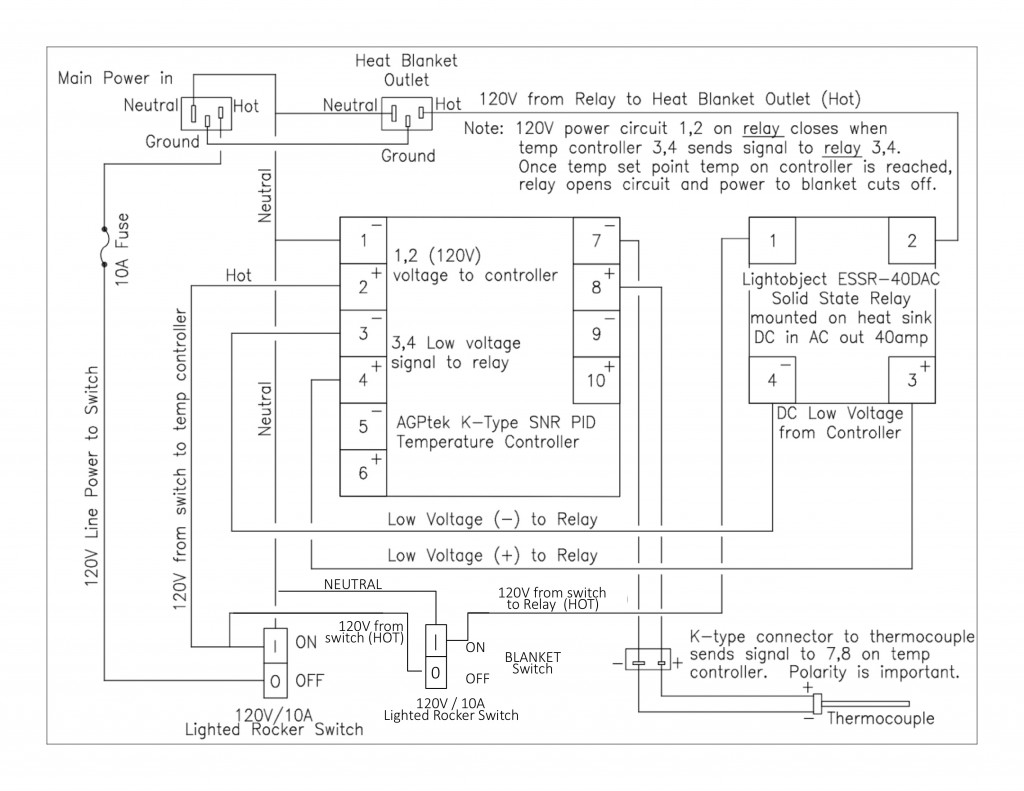
Building the Temperature Controller
The Temperature Controller is a very simple project to build, all that’s required is basic soldering skills. Just click the button below to find the schematic, basic build instructions, a parts list, chassis layout. I put together a small manual on using the controller which is also found below.
I used a MyPin PID Controller (Amazon), although there are many others available. Do some searching as the price of this device varies quite a bit. At the time I wrote this, I found it for as little as $20 and as high as $60 for the same part. The solid-state relay (SSR) I used is a uxcell product available on Amazon for $10 including the heat sink. Amazon also has a combo of the PID and SSR but without the heatsink. As with the controller, the Thermocouple Probe (K-type) varies in price too plus you have lots of options (rod, wire, etc.). I purchased a rod-type but upon reflection would have preferred a wire-type. The rod style, if not careful, might indent your wood. For now, I just make sure the rod is between the blanket and steel slat and not over any wood.
Note in the picture I’ve added some ventilation holes over the SSR. Probably unnecessary but why not have that extra protection. On the underside of those holes I glued some screen material to keep dirt out.
If you have questions, please contact me.